Showing posts with label dress. Show all posts

Saturday, February 18, 2012

Nautical Wrap Dress Take 2


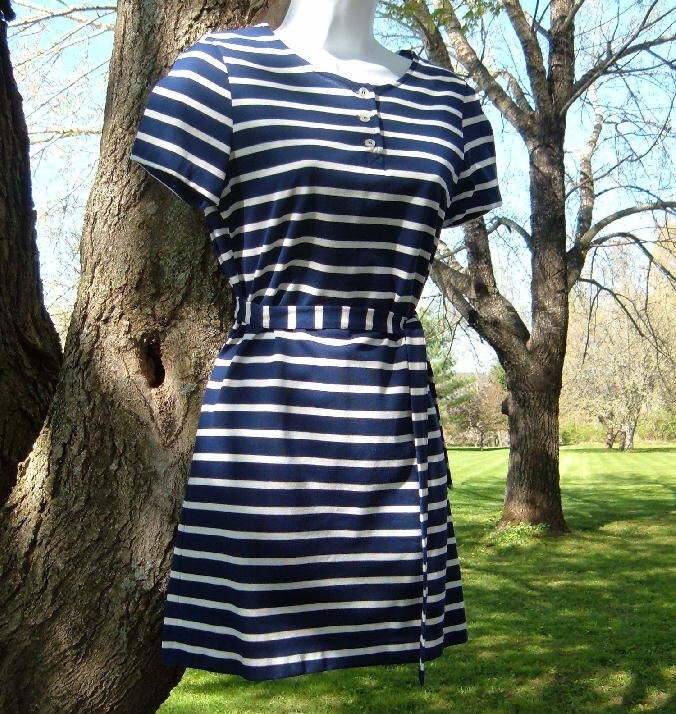
I fixed my Nautical Wrap Dress and let me just say...SO MUCH BETTER! I also did a real hem on all edges and put a pleat in the neckline to make the back neckline smaller (much better fit!). I used a simple white light-weight quilter's cotton to make the ties, and made a hole to slip one through at the side seam on one side (and very crudely hemmed that with a very wide, very short zig-zag stitch). I absolutely love how the bow came out, and the fit is fabulous. I must say, this is my most wearable item of DIY clothing. Perfect for our weekend in Cape Cod to celebrate our 5th anniversary. Ok...no more technology. Hope you're having a great weekend everyone!

Monday, February 13, 2012

Nautical Jersey Wrap Dress - Take 1

*Disclaimer* These were taken at 11pm after a long day of work, class, and paper writing. Also, I did not use an iron...obviously. I just really wanted to post this!


Last week, I went to Gather Here in Cambridge, MA to buy some new fabric. I ran across this great blue and white nautical organic jersey that I thought would be perfect for a wrap dress. I have this great blue wrap dress from Banana Republic that fits like a dream...and I wanted another one! Well...this is the first step in the process. I thought I would be creative and use buttons instead of ties to make it a little unique, and maybe even a little cuter. Turns out you shouldn't try to reinvent the wheel. I didn't alter the shape of the bodice pieces to accommodate this (= baggy neckline), and as the day goes by, the soft, stretchy jersey gets too loose for a little button to hold it in place. Well...lesson learned. Take 2 will have to wait til I get a little more free time, but until then, I'm pretty happy with it! It's super cozy, and the pattern is very contemporary. Just take a look at these beautiful pieces. 


Check out more cute nautical inspirations here!


I did a simple rolled hem with my serger. I thought about doing a bold lining, but I didn't have a white jersey, and I thought a stiffer cotton would make it drape wrong. I'm thinking about doing a full hem around all the edges, but I'm going to wait and see what it looks like once I put on the ties. I am thinking of making the ties out of a bright white. Hopefully in jersey, but perhaps in some spare cotton lining I have lying around. We'll see. Mainly I didn't want to do the ties because you need to have a hole in the hem to pass the tie through, and I hate needing to wear something underneath so you're not just looking at my side. Anyhow, I admit defeat, and will have to continue this project another day. I am already fantasizing about graduating from school and having free time again! It hasn't even been a year yet! Whew! 

Any suggestions on how I could improve this piece? 

Oh, and a great, big Happy Anniversary to my boyfriend! (although he doesn't really read the blog...he lives it. lol). We've been together for 5 years now...what a great Valentine's Day to celebrate! We're doing a quiet night at home, and then possibly visiting the Cape over the weekend. I would love to have this done by then...very sea worthy! What are your plans?

Saturday, January 21, 2012

Birthday Dress


Yesterday was my 27th birthday. I went to work, then came home and had delicious desserts that the boyfriend bought for me. He's so sweet. :)

Anyway, I woke up this morning, thinking about what I could possibly wear to my birthday dinner, and decided to finally make a dress I have been meaning to make for quite some time. It is a simple A-line dress, unlined, with circle-ruffle straps. Took about 2.5 hours. 


It finally snowed here in MA, so I wore the dress with brown leggings, brown boots and a bright blue sweater. I love patterns...they make choosing accessories a lot easier! We had a great dinner in Boston's North End. Yum!


I love the way the straps turned out...this will be great for spring!


I also made bread for the first time last weekend with my new KitchenAid mixer...*squeal* It was glorious! I'm afraid there won't be much more industriousness until the semester is over (it starts Monday). :(
Happy Saturday everyone!


Tuesday, November 8, 2011

Fall Artifact Globe Tutorial - Reggio Emilia Inspired


I've been crazy busy since our vacation, so no new sewing projects. However, I wanted to share with you a project that I did with the little boy I nanny for. We have been exploring the neighborhood all year, and he is especially interested in all the little details of nature: seeds, leaves, sticks, berries. We've talked about the leaves changing with the seasons, how berries and seeds make it from the tree to the ground (my favorite was talking about how birds eat the berries and plant trees through their..well, you know. :), and all kinds of separate discussions. To extend this exploration, now that the weather is getting colder, and to make this accessible to the 11 month old (while eliminating the choking hazard), I brought the idea of the wave bottles into play.


Instead of using the little bottles again, I found these plastic snow globes at Michael's for $3.49 a piece. I don't have to glue these shut, because there's no way the kids are going to be able to take out the giant plug (it was really hard for me!), so we can use these again and again. Today, we took a walk around the neighborhood and picked up some Fall Artifacts along the way, including leaves, sticks, seeds, dried berries, etc. I brought them home and made these beautiful Fall Artifact Globes in minutes! Here's how:

Take off the cap and plug.


Fill with your Fall Artifacts, sorted by color, type or size.

Replace the plug and cap, gluing if you are worried about supervision. These seal fairly tight, but it never hurts to be safe!


These are perfect for infant/toddler/preschool and beyond! Reggio Emilia inspired, bringing the natural world into the classroom (or home!) and really focusing on the beauty of the objects. I love these! I can't wait to see what the kiddos think. :)

I also forgot to share my last vacation dress with you! Here's the blue dress I made last minute.


Here I am at the Byodo-In Temple in my dandelion puff dress. I put some beautiful blue buttons as embellishment, and a faux train on the back, much like my tiered skirt had. I love how it turned out, but I don't have any photos of the back.


We had such an amazing time! :)

Happy Tuesday everyone!


Saturday, October 8, 2011

If You Like PiƱa Coladas...

My boyfriend and I are finally on our Hawaii vacation! Our friends get married tomorrow, but until then we are hanging around and enjoying the sights. I wore one of my new dresses today, one of two that I haven't shown on the blog yet because I made them in such a big hurry before the trip. I hope everyone is enjoying their three day weekend! Here are some pictures from our trip so far.


 My new sunny yellow dress for the trip. This is light, since I didn't line it, and has little flower details in the neckline trim and three buttons on the bodice.

Perfectly light for the hot day today!


I brought a bunch of my ribbon flowers, like this one, for the trip, but I also got some things at the shops. I couldn't help myself.

Have a great weekend everyone!

Monday, September 26, 2011

$10 Maxi Dress Refashion

I apologize for the pictures...these are all taken on my phone because we ran out of batteries for the big camera. Anyhoo, there's a dress I picked up at Marshall's for $10 a couple weeks ago. It is a size too small, especially in the bust, and I hate the length. But when I tried it on, I could see its potential.
It also had a hole in the seam...probably after sooooo many people tried it on. Well! I knew I could fix that one! I got an extra amount off the already low price and brought it home to refashion.
I wanted to shorten it, so I measured where I wanted it to fit and cut off the excess from the holey middle.
I pinned the two pieces together and serged. Go, Go, Gadget Serger! Yay! Still can't get over how awesome this thing is... :)
Next, I tackled the bust. It will still be a bit low (might put something along the neckline...still looking for lace), but removing the eeny weeny pads helped free up some fabric. I just unpicked the seam, took out the cup, and stitched it back together by hand.
I did the best I could to keep the pattern somewhat together, but the bottom half was wider, so I just sorta made due, and plan to sash or belt it to cover that up. No problem!
Much more flattering and now it fits perfectly! And no, no on-the-body pictures this time...let's keep this blog a little modest.
I've also been gearing up for fall. Bow making!
And decorating! This is the first year we have a house to decorate, rather than a hall in a building, so I put this little web up in our front window, a wreath on the door, some little yard signs that say BOO! EEK! (cute, I'll post pics another day) and a few little things inside. I love Christmas Tree Shops! All that stuff for $30!
Oh, and I had to share this bow. :) I made it to go with my outfit I wore  this weekend. I love the mix of color and pattern. What do you think?


Saturday, September 10, 2011

My Charlotte York Dress


This is by far my favorite dress I've made so far. I took inspiration from the character Charlotte York on Sex & the City...I've always loved her preppy, chic and modestly flattering style. There was a particular blue dress with a square neckline that I had in mind when making this dress, but I can't seem to find a picture of it online. Here are a few others that I like.


I wore mine today with a cream cardigan, pearls and leather accessories.


The square neckline got skewed into a slight sweetheart due to the fit...I think I need to make my darts a bit bigger. Anyway, I love how this turned out! I feel so elegant in it. :)


Again, I did the elastic back...I am going to attempt a zipper soon. Eek!


I used a different kind of elastic for this one, and actually got a bit of a looser fit. Still lovely and easy.


Now if I could only afford some Manolos to go with it...hehehe.