It's finally here! My two-tiered floral skirt with elastic waistband....the skirt for which I could not find a good tutorial. There were many skirts with a similar idea or purpose, but nothing that is like what you find in stores these days....floral, black elastic, separate tiers that create a layered-ruffle look. I absolutely love it, and there is a little surprise in the back.
You know, I don't really want to show my bum off on the Internet, but I had to add a photo of the "panel" that I was going to add to the side, and it was going to be this giant ruffle....well, that was a really tricky thing to try and wrap my head around. The idea was in there but it couldn't come to fruition. So I added the panel, ruffling up at the top, but when I tried it on, I decided to wear it in the back. A crazy idea that kinda seemed like the cross between a tail and a really short train on a formal gown. I thought it was a pretty crazy thing to do, but my boyfriend really liked it, and I do too! I added it because I cut the material just an inch or so too small (must have measured wrong, it is a very silky and fluid material) and I didn't want to scrap the project. What do you think of the panel/train?
Anyhow...on to the tutorial!
Start with a material you love! I chose this from Joanne Fabrics. It was hard to find something with a medium-sized floral pattern in the colors I wanted, so I chose this polyester material (I know, I know, but this one feels silky and shiny and looked closest to what I wanted visually).
Cut two pieces the length of your widest part (hips/tummy?) and about 5 inches wide, leaving an extra inch for seam allowance. For instance, if your hips are your widest part, and are 37 inches around, your small pieces should be 38 x 5inches. My pieces were cut on the fold, so they are pictured folded in half (I think this is how I made my size mistake, having cut all my other skirts differently).
Next, cut two larger pieces roughly 14-15 inches longer than your small pieces, and 8 inches wide. For the example, these pieces would be 52 x 8 inches. If you want to do a true ruffle, the pieces will need to be three times as long....obviously, I didn't choose to do this.
Sorry for the junky picture! The next step is to hem one side of each of your large pieces. Simply fold over half an inch, pin, and sew. My fabric was so impossibly fluid that I had to use my ruler and lots of time and patience to make sure it was straight. If you use cotton, much easier, but you may want to iron your hem.
Now, we begin the layers. Start with a small piece, right side up. Second, layer a hemmed large piece, right side down, and finish with a small piece right side down. I used a ruler to keep the edges straight.
Find the centers, and pin them together.
Your layers should look like this.
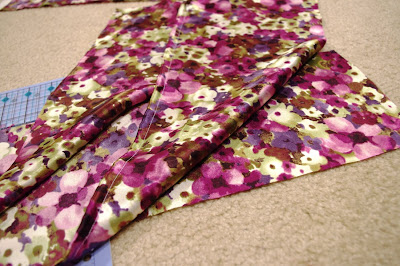
Make folds in the middle (large) layer about 3/4 inch. These should be spaced roughly 5 inches apart, or however many inches it takes for your middle layer to match the two small layers in length.
Pin the layers together at the folds.


This is what your folds/rufflles should look like when you are finished.
Sew the layers together using a simple straight stitch
Cut off the excess material, careful not to cut the skirt itself.
Here is your waist and first tier. Underneath will be the third piece, to which you will sew your second tier.
I hope I describe this properly because it is a little complicated to take a photo of. You are going to pin your second tier (second large piece) to the bottom layer (the piece that was right side up to begin with). Keeping this bottom layer right side up, place your last large hemmed piece right side down along the free, unsewn edge. Repeat the folding process. Sew these together with a straight stitch.
Your layering is done! Here is how your skirt should look.
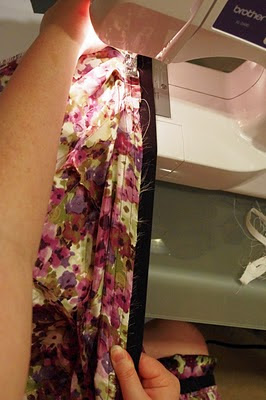
I apologize for not having a picture of this step before it was finished. Similar to the Jean Ruffle Skirt, you are going to attach elastic to the waist of your skirt, but instead of hiding it inside the material, it is going to simply be attached to the top of your skirt. I pinned the top of my waistband to the elastic at 5 points: each end, middle, and quarters. Then I pulled the elastic so that it was stretched out, straight and even with the fabric, and sewed.
This is what the fabric will look like when you let go of the elastic. It should be scrunched, which will enable the fabric to stretch over your hips. I sewed in two places to make it extra secure.
Finally, sew the two ends of your skirt together so that it is completely closed. This is done with right sides facing each other so you are sewing on the inside of the skirt.
If you want to make the little panel/train like mine, just cut a rectangle of fabric as long as your skirt, and about 10 inches wide. Gather at the waist end and sew. Hem the bottom. Finally, sew the sides to the ends of the skirt to close the skirt. I plan on taking this panel away if/when I lose weight, but for now it's a little extra surprise to my skirt. If you'd like a more complete tutorial on the panel, let me know...I didn't take any pictures!
And there you have it! Not-so-simple, but super cute!
I hope you try out this skirt...it is much cheaper and just as cute as the ones in the stores! Let me know if you make a tiered skirt and if you had any tips/tricks for my readers. Happy sewing!


I love the fabric! It's gorgeous! I'd love to have a pretty floral tiered skirt like this one. Thanks for the awesome tutorial! I have decided about the panel in the back yet. I'm sure it'll grow on me though! I love ruffles and anything girly like almost-trains :)
ReplyDeleteHehe, thanks Heather! I spent SO LONG trying to think of something that would look ok, and I wanted it to look intentional, not like a mistake...which of course it was. I kinda like thinking of it as a mini train though. :)
ReplyDeleteVery cute skirt! I don't know if I'll be able to pull off something like this with my beginning sewing skills but it's bookmarked for later :)
ReplyDeleteVery cute! My sewing machine has been getting dusty, this makes me want to put it to good use!
ReplyDeleteThanks Amy and Sarah!
ReplyDeleteSleeves aren't too bad as long as you have a good pattern and learn what ease-stitching is. You should try some!
ReplyDeleteThat's a great tutorial, and a great skirt. You've been tagged. I hope you have time to participate. If you don't, I understand.
ReplyDeletehttp://prayersformymom.blogspot.com/2010/09/ive-been-tagged.html